How to connect your Salesforce database to Glide
11 min
read
Discover how to seamlessly connect your Salesforce database to Glide, making data integration effortless. Boost efficiency and streamline your workflows today.
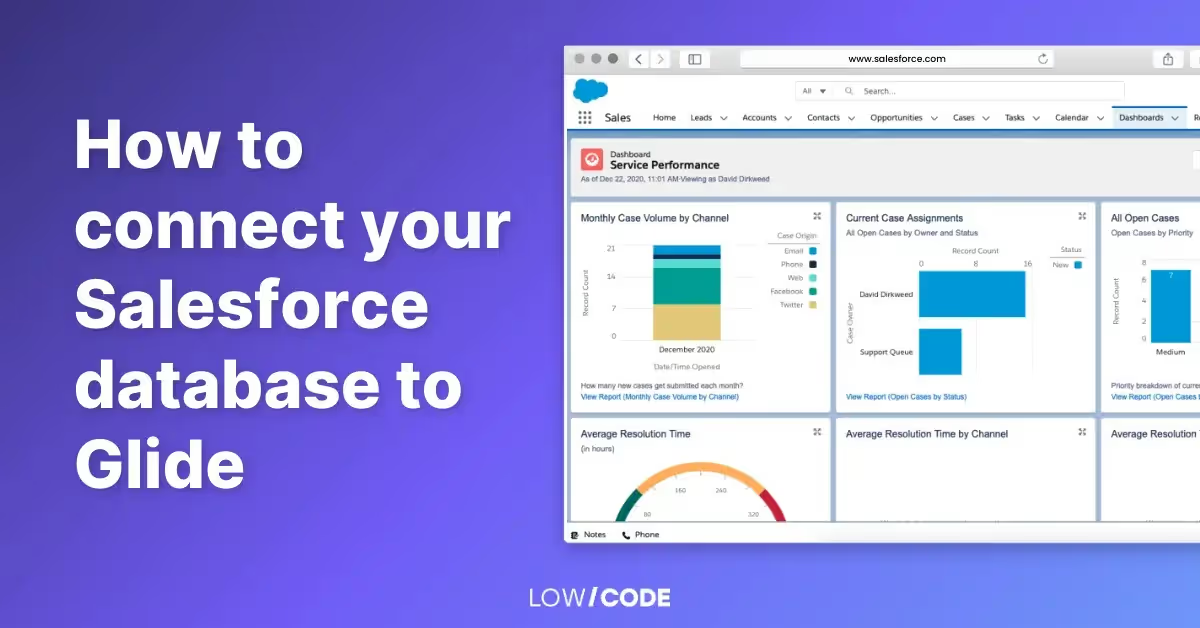
What is Salesforce?
Salesforce is a leading customer relationship management (CRM) platform that centralizes customer interactions, streamlining processes, and improving business efficiency. By integrating sales, marketing, customer service, and analytics, Salesforce provides a complete view of each customer to enhance the overall customer experience. Its extensibility, powerful API, and customization capabilities allow it to meet the diverse needs of businesses across various sectors.
In addition to its CRM capabilities, Salesforce offers a suite of specialized solutions:
- Sales Cloud: Enables businesses to manage leads, track progress, and automate sales processes.
- Service Cloud: Offers customer service solutions including case tracking and social networking plug-in for conversation and analytics.
- Marketing Cloud: A platform for managing marketing relationships and campaigns, with tools for email, social media, and mobile marketing.
- Analytics Cloud: A business intelligence platform for data visualization and making data-driven decisions.
Salesforce's unified approach sets it apart from traditional databases. Instead of isolated data silos, Salesforce centralizes customer data into a single, integrated platform, enhancing collaboration across different departments. Each interaction with a customer is recorded and accessible organization-wide, fostering personalized interactions and facilitating the anticipation of customer needs.
Built on a robust, reliable, and secure cloud infrastructure, Salesforce offers anytime, anywhere data access. It empowers businesses to make data-driven decisions through real-time data processing and advanced data analysis tools.
In conclusion, Salesforce is more than just a CRM platform. It is a comprehensive, flexible, and user-friendly tool that provides a holistic view of the customer, making it an ideal choice for businesses looking to strengthen their customer relations and stimulate growth.
What is Glide Apps?
Glide Apps is a revolutionary platform that has democratized mobile app development by enabling users to build applications directly from commonly used data sources like Google Sheets, Airtable, Excel, and its own native database, Glide Tables. Known for its user-friendly interface and intuitive design, Glide requires minimal to no coding skills, making it accessible to individuals, small businesses, and those without a technical background.
At its core, Glide Apps transforms your data from Google Sheets, Airtable, or Excel into a sleek, fully operational mobile app.
Here's a look at some of Glide's notable features:
- App Creation: With Glide, you can design versatile apps for a multitude of purposes, including project management, inventory tracking, directories, event planning, and more. The platform's breadth of application makes it a valuable tool for a wide array of use cases.
- Data Synchronization: Glide excels at maintaining data integrity. Any changes made in the connected Google Sheets, Airtable, or Excel are instantly updated in the Glide App, ensuring real-time data consistency. Furthermore, if you use Glide Tables, data synchronization becomes even more seamless and efficient, enhancing the app's performance.
- Customizability: Glide provides extensive customization options, allowing you to select different layouts, color schemes, and add various components like images, text, buttons, etc. This functionality empowers you to design an app that reflects your brand identity and caters to your specific requirements.
- Interactivity: Glide allows you to incorporate interactive features in your app. For instance, you can add forms for user input, which directly feeds data back into your connected database.
One of Glide Apps' standout attributes is its simplicity and accessibility. The platform allows you to bring an app to life within minutes without the need for extensive coding knowledge or a substantial development budget. This accessibility, coupled with its integration with familiar tools like Google Sheets, Airtable, or Excel, positions Glide as a particularly appealing choice for small businesses, educators, and individuals seeking to create straightforward yet effective apps.
Why do we need to connect Salesforce to Glide Apps?
In the dynamic world of business and technology, integrating different systems has become a prerequisite for efficiency, growth, and better customer experiences. One such integration that holds immense potential is the connection between Salesforce and Glide Apps.
Here's why this integration is beneficial:
- Streamlining processes: Salesforce, being a powerful CRM, holds a wealth of customer information. On the other hand, Glide Apps, with its capacity to quickly create mobile applications, presents an excellent tool for businesses to interact with customers. When you connect Salesforce to Glide Apps, businesses can streamline their operations by having their customer information accessible directly within their mobile applications.
- Enhancing customer experience: With the integrated system, businesses can provide more personalized and user-friendly experiences to customers. The data from Salesforce can be used by businesses in Glide Apps to tailor the content and design of their apps based on individual customer preferences and behaviors, enhancing overall customer satisfaction.
- Real-time data access: Integrating Salesforce and Glide Apps provides real-time data synchronization. Any changes made in the Salesforce database can be immediately reflected in the corresponding Glide App, ensuring data consistency and real-time access to information. This is especially crucial for businesses that require timely and accurate data for decision-making.
- Increased productivity: Connecting Salesforce and Glide Apps can significantly boost productivity. Businesses can save time and resources that would have been spent manually updating the app or transferring data between the two platforms. The automation of these processes allows teams to focus on more strategic tasks.
- Scalability: As businesses grow, the need for efficient data management and customer interaction tools becomes more pressing. The Salesforce-Glide integration is scalable and can grow with your business, ensuring your customer management and mobile app needs are always met, no matter the size or complexity of your operations.
In conclusion, integrating Salesforce and Glide Apps not only boosts operational efficiency but also provides opportunities for improved customer engagement, data management, and overall business growth.
How do we connect Salesforce to Glide Apps?
As we delve further into the possibilities of integrating Salesforce and Glide Apps, a critical element that makes this connection possible is a tool known as Make (previously Integromat). This advanced automation software serves as a conduit between these two platforms, enabling the seamless synchronization of data and simplifying the overall operational workflow. By harnessing the functionalities of Make, businesses can effectively merge their rich Salesforce CRM database with the adaptable mobile application landscape of Glide Apps, fostering an integrated digital ecosystem. This section will illuminate the process of using Make as a crucial bridge between Salesforce and Glide Apps.
Create a Make account
- Go to the Make.com website.
- Click on the 'Sign Up' button which is usually located at the top right of the webpage.
- You'll be redirected to the sign-up page. Here, enter your email address, desired username, and password.
- Click on the 'Sign Up' button to create your account. You may be asked to verify your email address.
- Verify your email address by clicking on the link sent to your email.
- After verification, you can log in to your Make account.
Create a scenario to update data from Salesforce to Glide
- First, log into your Make account and navigate to the 'Scenarios' tab.
- Click 'Create a new scenario' on the top right.
Next, we will talk about the modules needed to update data from a specific table in Salesforce, to a specific Sheet in a Google Sheets file that is connected to Glide.

Assuming we want to update data from the Accounts table in Salesforce to the same table in Google Sheets, first up, use a Google Sheets > Clear Values from a Range module to clear all existing data.
It’s a good practice to clear existing data and mass update the newest data from Salesforce. If you do an insert without clearing first, like the method we introduced in our guide to connect data from NetSuite to Glide, there will be cases where this happens:
- Your data from the last update contains 1000 updates.
- Someone goes in and delete 5 rows, and add a new row, now it contains 996 rows.
- You do an insert without clearing, then what happens is 996 rows will be added to the first 996 rows in Google Sheets, but the last 4 rows are still there from the previous version. This is not the outcome we want. In our guide to connect data from NetSuite to Glide, we were sure that the Azure database will only keep growing, so the strategy there was applicable.
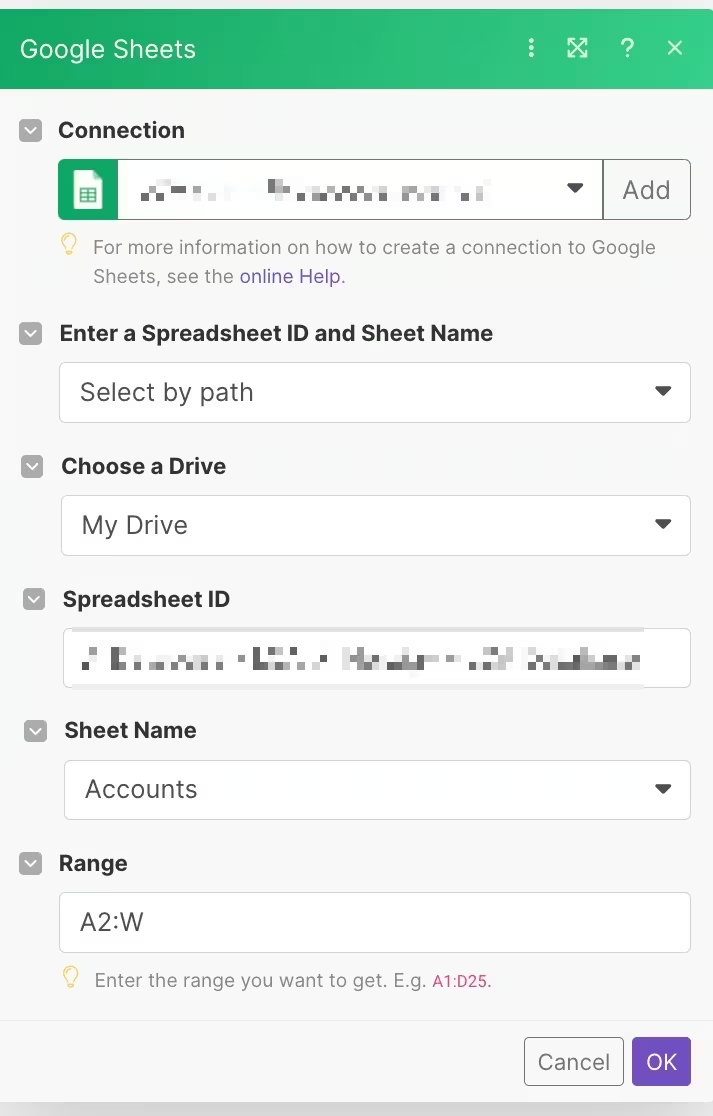
After establishing a connection from Make to your Google Sheets using the Connection, you can then choose the path to the Spreadsheet you want to update in the “Spreadsheet ID” section.
Next, you choose the Sheet Name and write a range you want to clear.
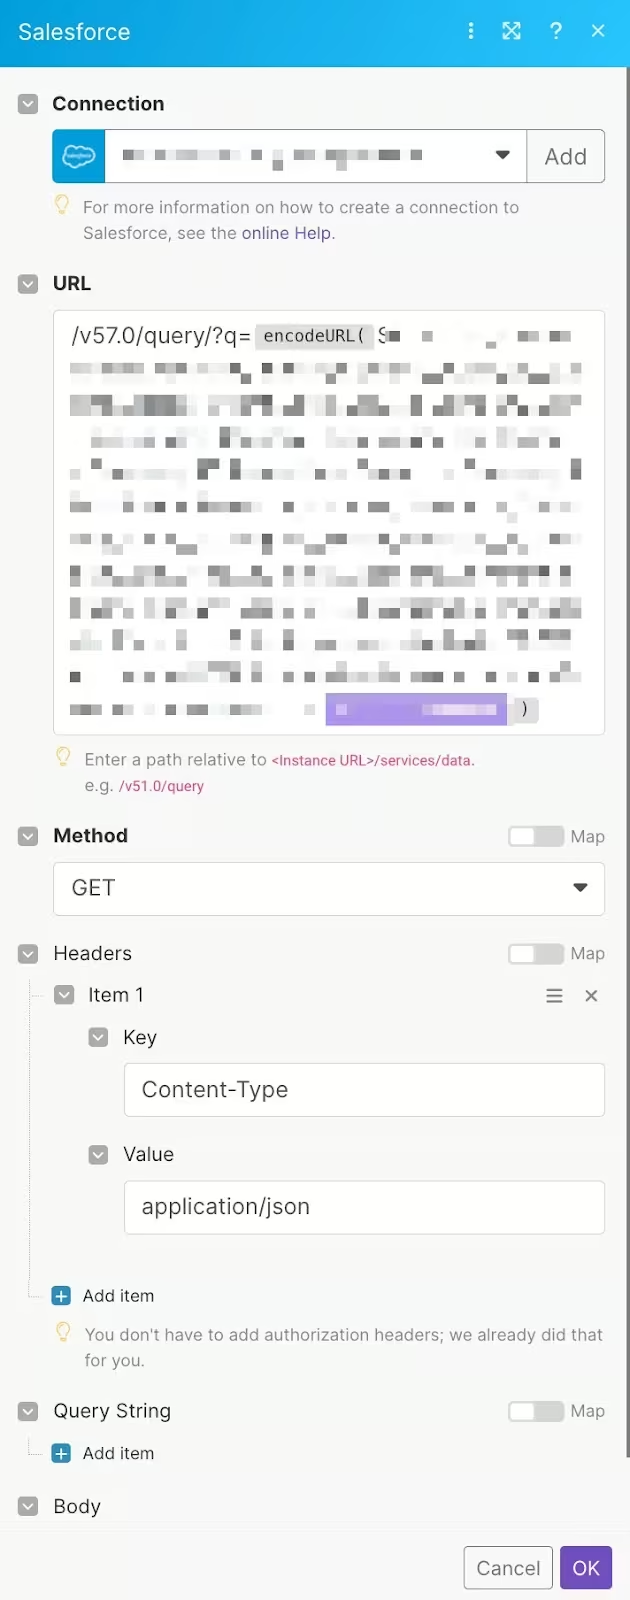
For the second module, you will use Salesforce > Make an API call. Establish a connection to your Salesforce account, then what you want to do is write a SOQL query.
What is SOQL? Salesforce Object Query Language, or SOQL, is a powerful querying language developed by Salesforce to facilitate data management within its platform. Similar to SQL used in database management systems, SOQL allows users to construct simple but powerful query strings to fetch specific data from the Salesforce database.
SOQL is used to search the organization-specific data within Salesforce. Users can craft SOQL queries to return specific fields of data, from one or more objects within the Salesforce database, according to the specified criteria. This makes it a valuable tool for finding precise subsets of data or for aggregating data in meaningful ways to gain insights.
Assuming you want to query all “ID” and “Name” from the Accounts table to do an update, the query will look like this:
SELECT Id, Name FROM Account
Then, the “URL” part of your module will look like this:
/v57.0/query/?q=encodeURL(SELECT Id, Name FROM Account)
You can read more about SOQL here.
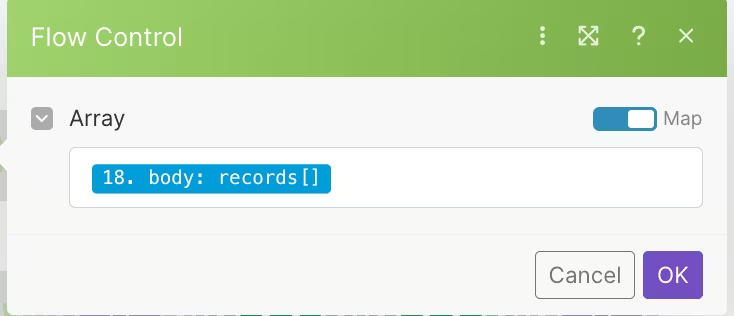
For the third module, we use an Interator to iterate through all records found using the SOQL query.
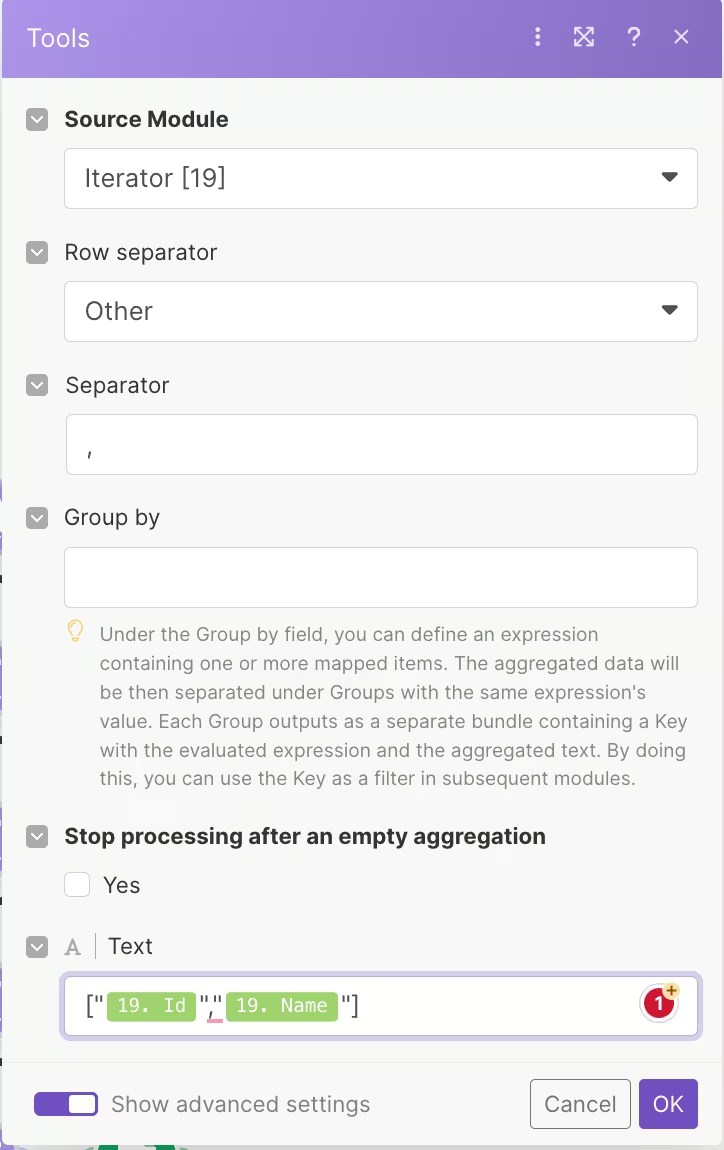
For the fourth module, we use a “Text aggregator” to aggregate all data needed, in a format that is suitable for Sheets API. Using the same example from the SOQL query step, we aggregate the “ID” and “Name” values in the “Text” section. Please also remember to set your Source Module to the Iterator we added as the previous module, and set the separator to a comma.
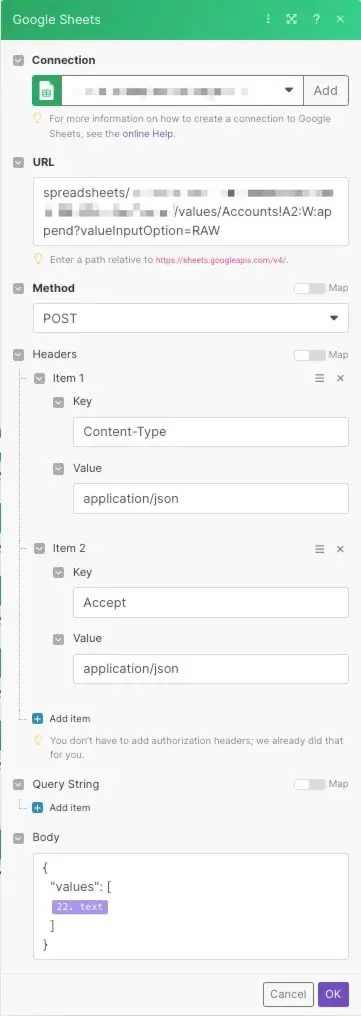
After preparing the data structure, we add a Google Sheets - Make an API call module. There are a few things you need to configure here:
- Adding your own account in the “Connection” section.
- Add a valid URL. The template URL should look like this: spreadsheets/[spreadsheet ID]/values/[range that you want to push the data in]:append?valueInputOption=RAW
To get the spreadsheet ID, go to your spreadsheet and copy the URL. It can look like this:
https://docs.google.com/spreadsheets/d/abcdef/edit#gid=0
In this case, the spreadsheet ID is “abcdef”, situated between the “d/” part and the “/edit” part.
- Set the method to POST and add headers.
- Add the body exactly like the screenshot, with an exception of the “22. text” value. Point that to the value you created from the text aggregator step. “22” here stands for the number of the text aggregator module, and it can be different in your case.
When this is run, it will replace all rows in the intended sheet with the rows we queried from Salesforce.
Create a scenario to update data from Glide to Salesforce
To keep your business operations running smoothly and effectively, maintaining data consistency across your platforms is crucial. One excellent example is ensuring that changes made in your Glide Apps are also reflected in your Salesforce database.
When a record is updated in your Glide App, Make can be set up to automatically detect these changes and replicate them in your Salesforce database. This ensures that your data remains consistent and up to date across both platforms, enhancing the accuracy of your business insights and improving overall operational efficiency.
We begin with the same 2 steps as the previous section, to create a “base” scenario:
- First, log into your Make account and navigate to the 'Scenarios' tab.
- Click 'Create a new scenario' on the top right.
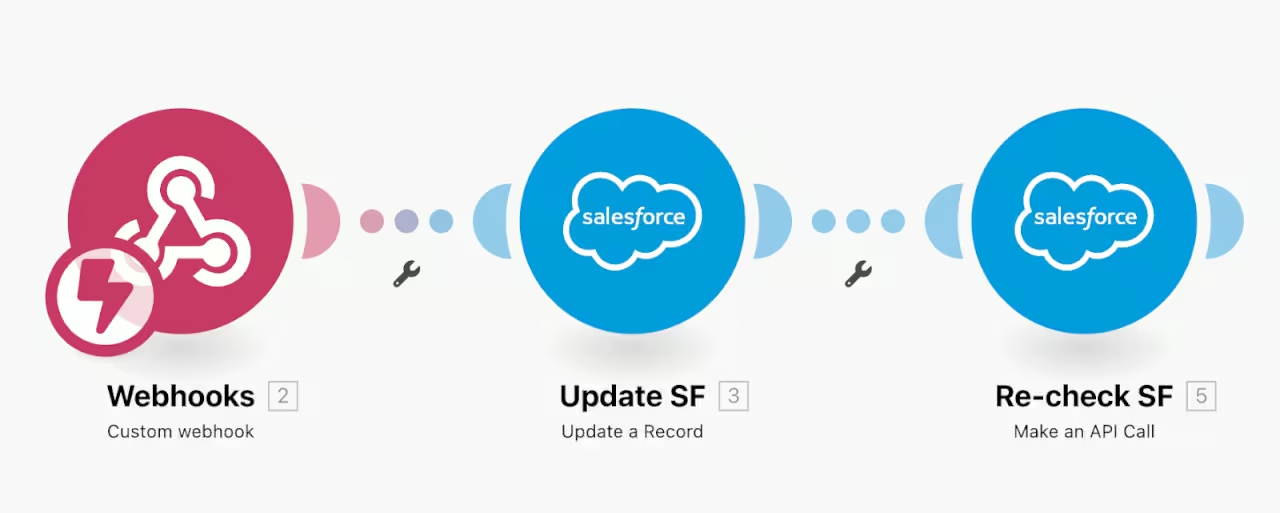
Then, the modules to be added will look like this, with the third one being optional.
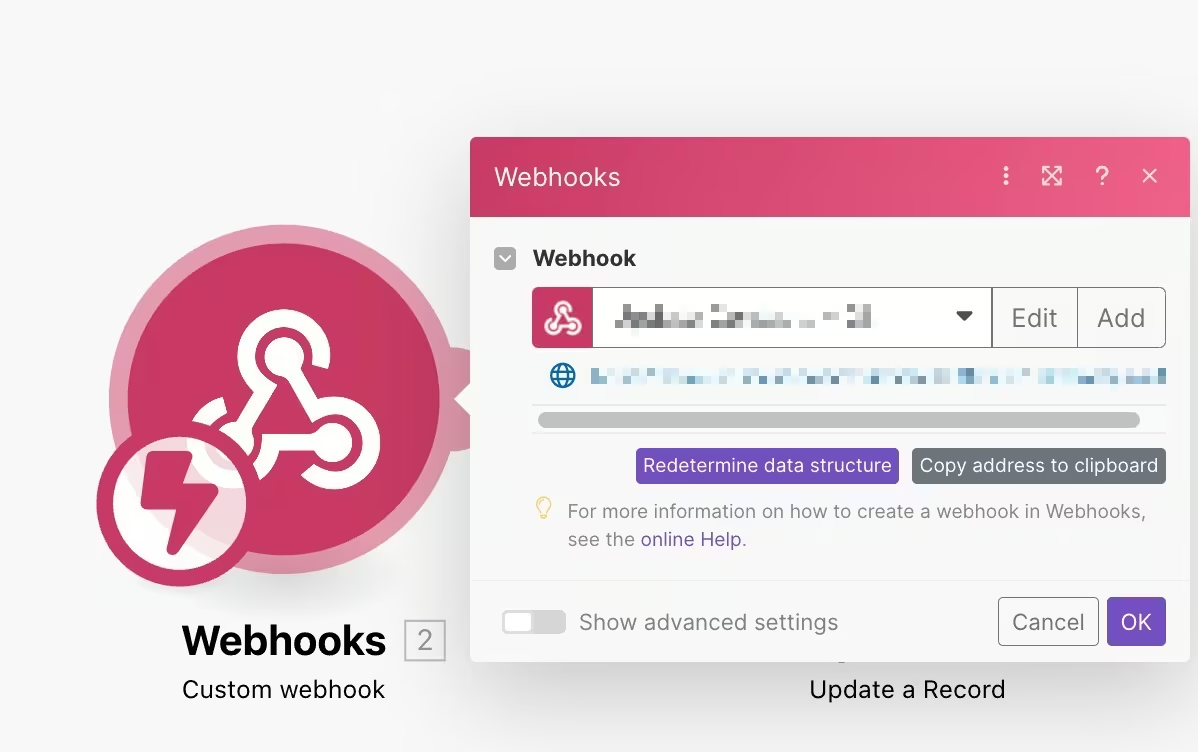
First, add a Webhooks > Custom webhook module. After adding, you will be presented with a URL that you can copy by clicking the “Copy address to clipboard” button.
Go back to your Glide Apps. For the screen where you make an edit to your Glide Apps database, add an action, or a step in a combo action, with the action being “Trigger Webhook”.
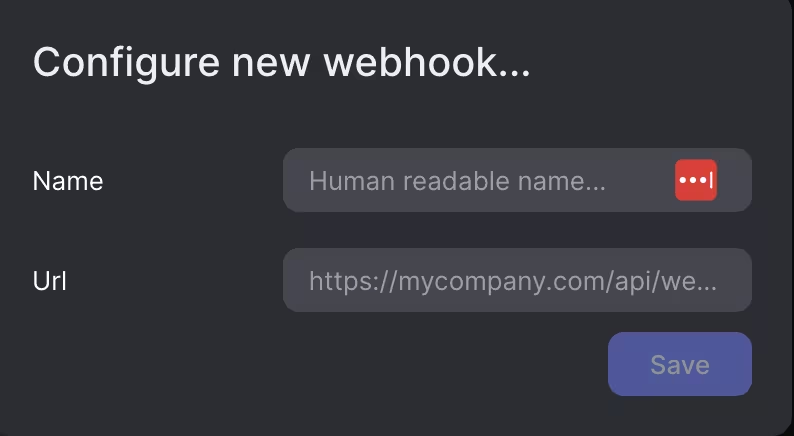
Click “Add new webhook”, give your webhook a name and paste the URL from Make in. Then click “Save”.
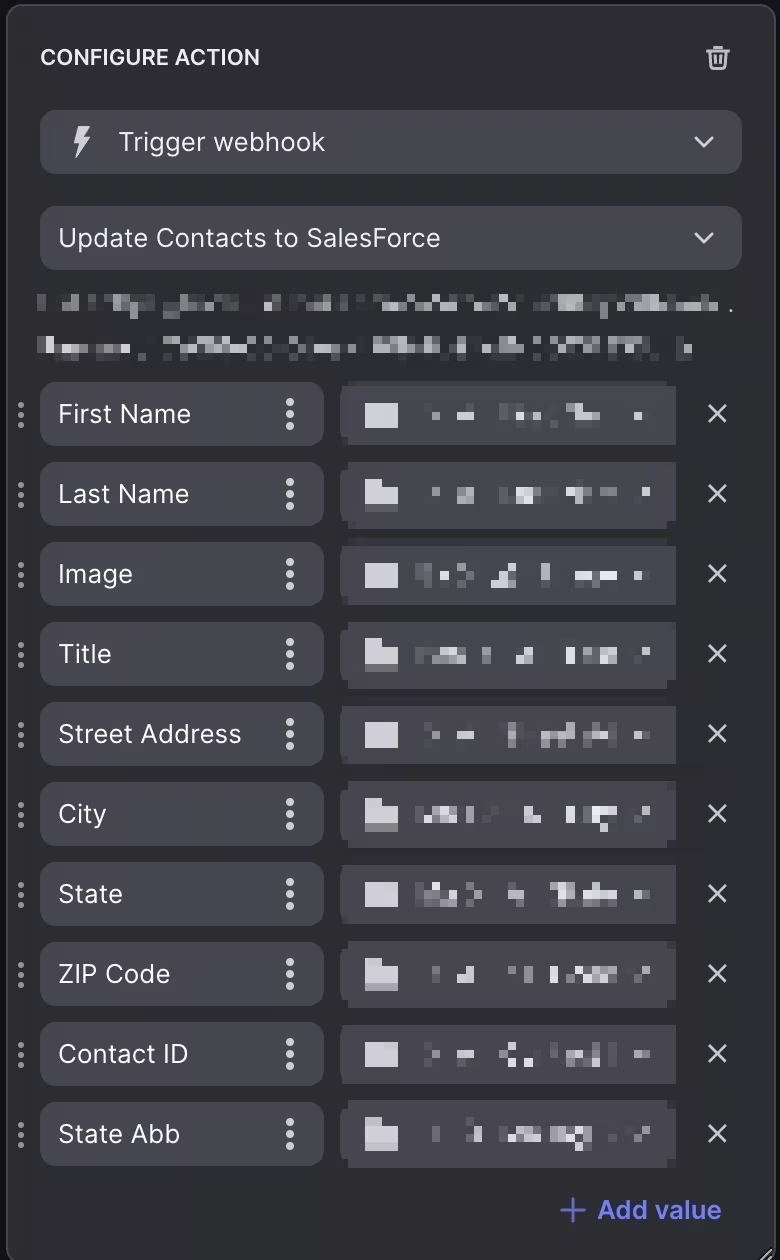
Click “Add value” to sequentially add fields from Glide to the webhook, and their respective field names. Field names will be on the left, while the actual value will be on the right.
Everytime an update is made, Glide will send a payload to the webhook URL you added above, thus initiating the Make scenario.
Go back to Make, click “Redetermine data structure”, and then make an edit in Glide to give the webhook its first payload to work with. After this step is done, click “Ok”.
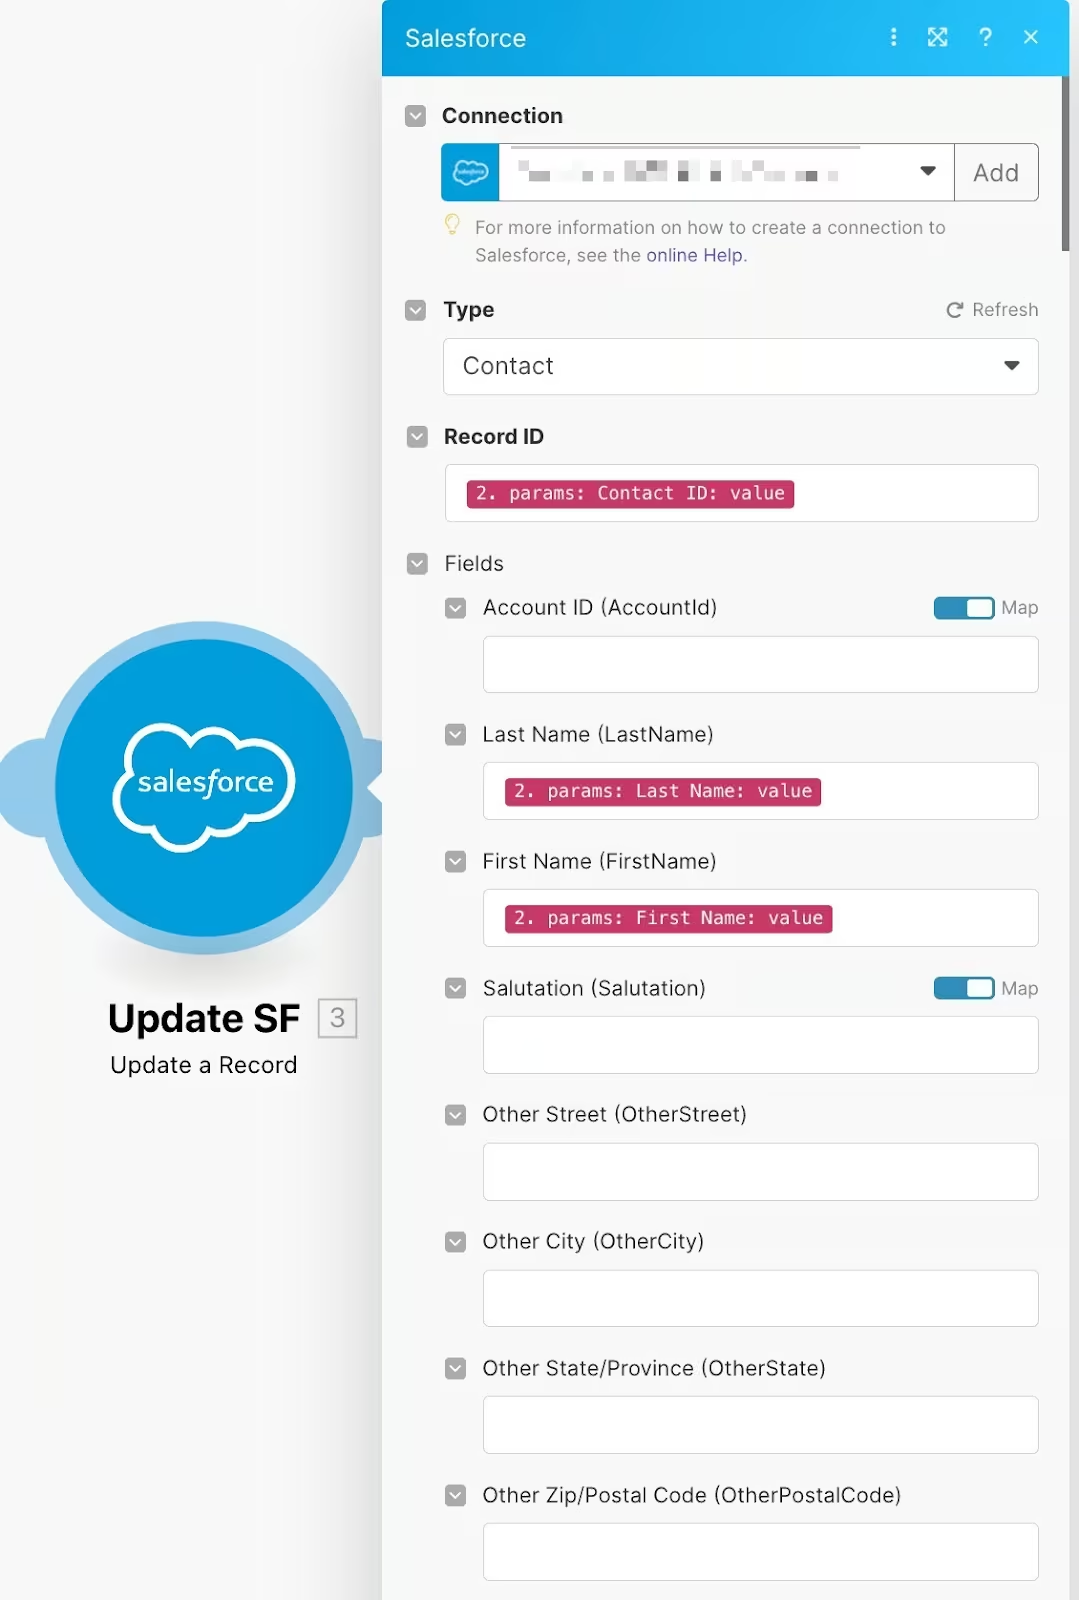
For the second module, add a Salesforce > Update a Record module.
After connecting the right account in the Connection section, choose the Salesforce table to update, in this example: Contacts.
Then, add values as needed to the right Salesforce fields. The “Record ID” is required so the API knows which row to update to, so it’s a must-have in your Glide > “Trigger Webhook” action.
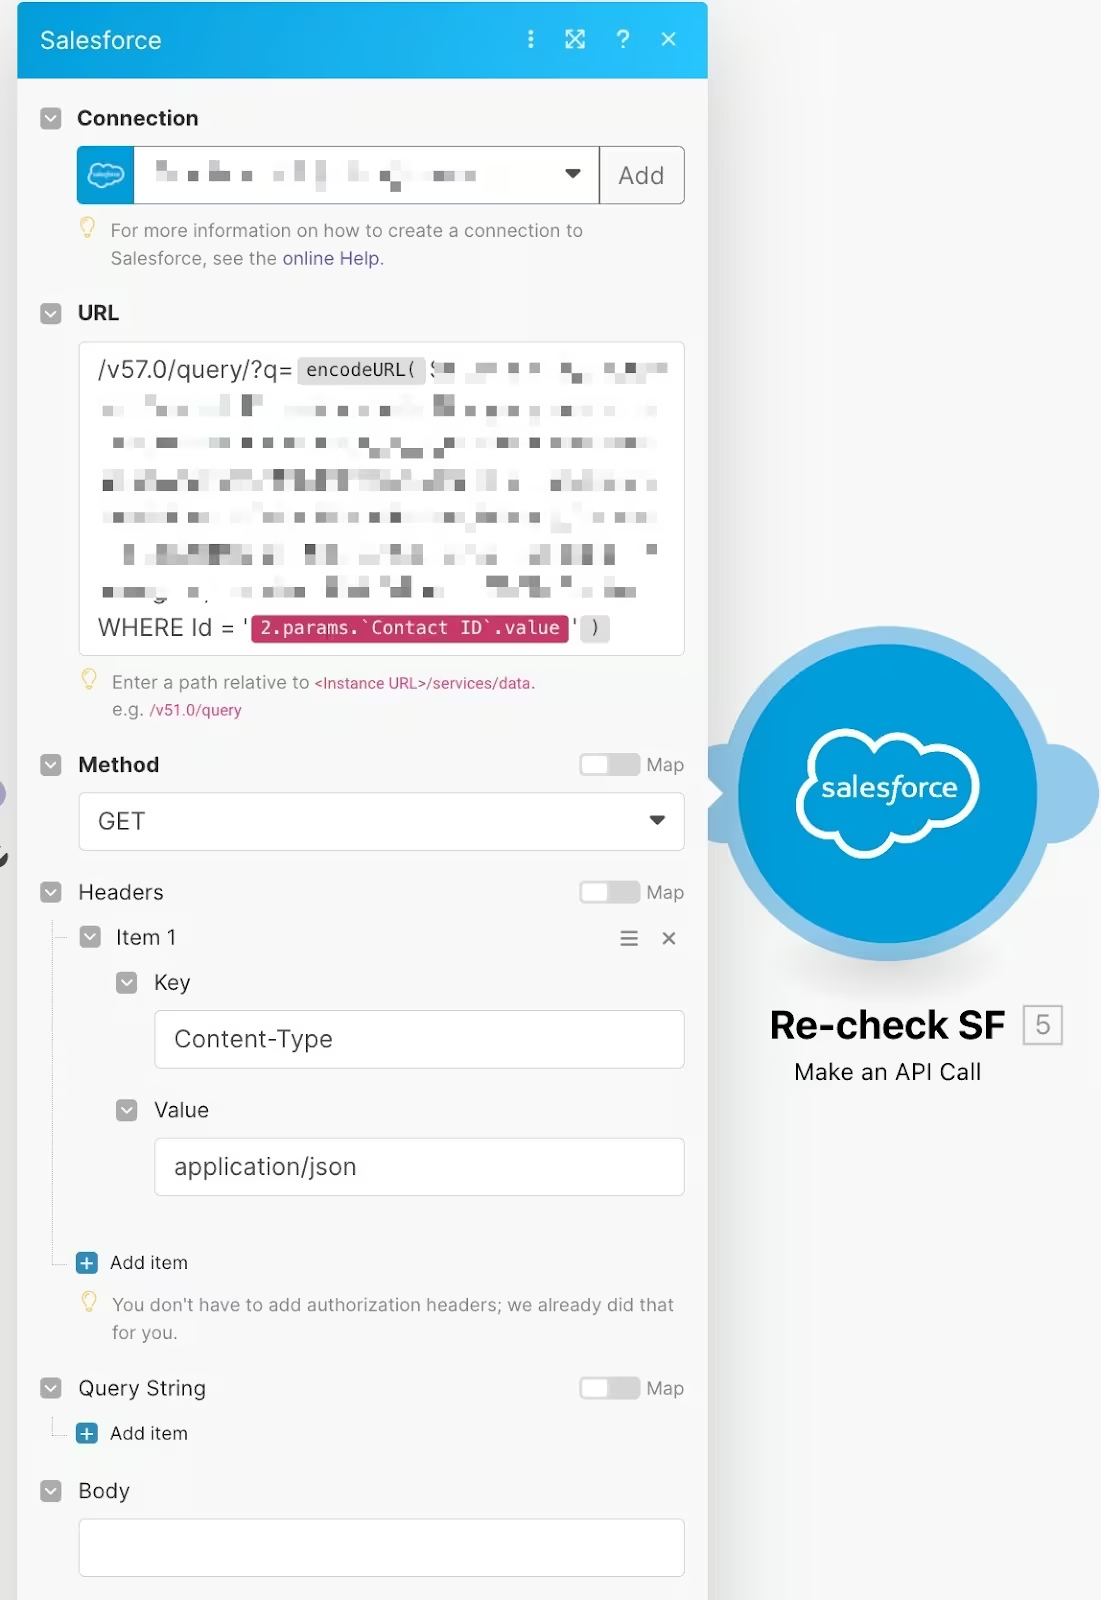
The third module is optional, where we use a Salesforce > Make an API call module to re-check the record we have just updated, to see if the changes have been made.
Using the same steps mentioned in the “Salesforce to Glide” section, you would establish a connection to your Salesforce account, then write a SOQL query.
Assuming you want to query all “firstName” and “lastName” from the Contacts table to check, the query will look like this:
SELECT firstName, lastName FROM Contacts WHERE Id = ‘Contact ID’
The “WHERE” clause is to check the exact row where have just updated, determined by the “Contact ID”. Please reference the Contact ID value from the webhook step.
Then, the “URL” part of your module will look like this:
/v57.0/query/?q=encodeURL(SELECT firstName, lastName FROM Contacts WHERE Id = ‘Contact ID’)
Conclusion
Today, the ability to integrate disparate systems is a powerful lever for achieving operational efficiency, enhancing decision-making, and delivering superior customer experiences. Throughout this guide, we've explored the process of connecting two potent platforms - Salesforce and Glide Apps - using the automation tool, Make. We delved into the capabilities of Salesforce as a robust CRM platform, the advantages of Glide Apps for creating user-friendly mobile apps, and the essential role of Make as a bridge facilitating this synergy.
The role of Salesforce Object Query Language (SOQL) queries was also highlighted, as they are crucial in manipulating and retrieving specific data from Salesforce, thereby enhancing the effectiveness of the integration. Additionally, the importance of maintaining real-time data synchronization between Salesforce and Glide Apps was underscored, ensuring that updates made in Glide Apps are automatically mirrored in Salesforce through Make.
At LowCode Agency, we've had the privilege of building this type of integration for various clients, garnering significant experience and insights along the way. Our team has witnessed firsthand how a well-implemented Salesforce-Glide Apps integration can boost productivity, scalability, and customer satisfaction.
As we conclude, it's worth emphasizing that the success of integrating Salesforce and Glide Apps rests on understanding your specific business needs and customizing the integration to meet those needs. The proper setup and maintenance of this integration can unlock substantial business potential.
If you want to embark on this journey of digital transformation, and experience the seamless operation and data flow between Salesforce and Glide Apps, powered by Make, you can trust our expertise and guidance. Contact us today!
Created on
September 17, 2023
. Last updated on
May 7, 2025
.

FAQs


